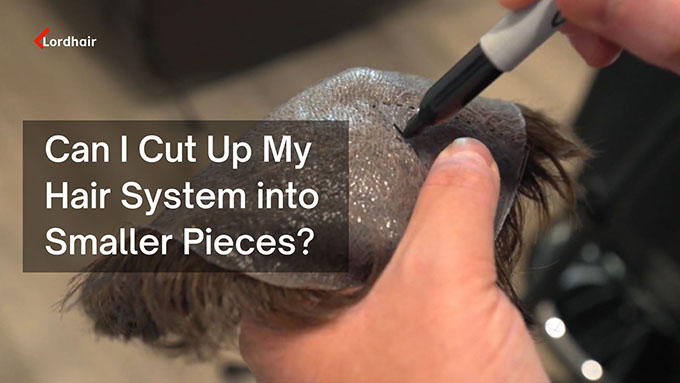
Can I Cut Up My Hair System into Smaller Pieces?
- Written by Maisie Martin
- | Published Mar 23, 2018
- | Updated May 13, 2026
- |
- 124 min read
 Listen to the full text
Yes, you can cut a hair system into smaller pieces at home. But it's not as simple as grabbing a pair of scissors and going for it. It requires patience, the right tools, and a good understanding of your base material. Once you cut it wrong, you could ruin the system entirely. Get it right, though, one full unit can turn into several usable pieces. This guide covers what you need to know before you start cutting.
Key Takeaways:
- Hair systems can be cut into smaller pieces for localised hair loss
- Lace is the easiest base material to cut into smaller pieces
- Correct tools such as small, sharp scissors and a mannequin head will help make the DIY process easiest
- Lordhair offers a professional base cutting service so you do not have to do it yourself at home
Understanding the Versatility of Hair Systems for Localized Loss
Hair systems aren’t just for full coverage, they can be adapted for targeted hair replacement too. If you’re dealing with alopecia or early-stage thinning, you don’t always need a full unit. A single system can be shaped into smaller, custom pieces that match specific spots on your head. This makes things more flexible and often more affordable, especially if you’re trying to stretch one system across multiple uses.
Why Cut Your Hair System’s Base?
Cutting your hair system’s base makes sense when hair loss is limited to certain areas instead of the entire scalp. For example, if you only have thinning at the crown or receding temples, using smaller hair system pieces can give you the coverage you need without committing to a full unit.
A standard 8”x10” toupee base gives you plenty of material to work with. You can break it down into a pair of smaller sections and still have leftovers for future use. That’s where base cutting becomes practical; it lets you control how much of the system you actually use.
It’s also a cost-saving move. Instead of buying multiple hair system units, you can create your own custom layout at home. Many people doing DIY hair system modification go this route to experiment with placement, density, and positioning before committing to a full setup.
But not every system handles cutting the same way. The material matters. A lot.
The Best Base Materials for DIY Modification
Not all hair systems respond to cutting the same way, so knowing your base material before you start is important.
Skin bases are the most forgiving option. Thin skin materials can be cut cleanly, as long as you use sharp scissors and follow your marked line. There is a smaller chance of ruining the base.
Full lace bases need more careful handling. The mesh edges are prone to fraying after cutting, so you may need to apply an anti-fray sealant along the cut edge to keep it from unraveling over time.
Hybrid bases that combine lace with a skin perimeter are a different story. The perimeter exists specifically for adhesive attachment, and you need at least 1 to 1.5 inches of it intact for tape to bond properly. Cutting a hybrid system down removes that perimeter. For this reason, they are not suitable for DIY size reduction.
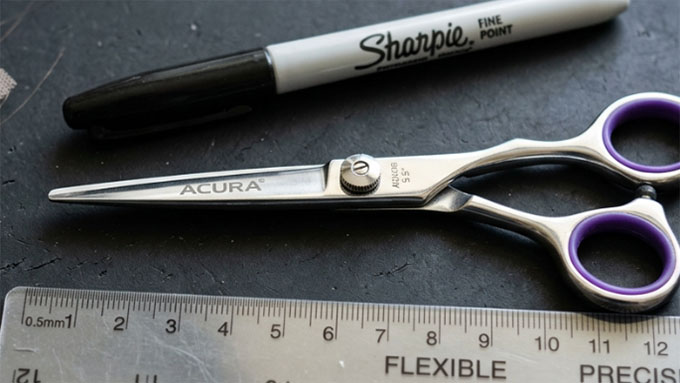
Essential Tools for Successful Base Cutting
Getting clean, usable results from base cutting depends a lot on the tools you use. You don’t need anything overly fancy, but you do need the right setup. A few basic items such as sharp scissors and a makeup pencil can make a big difference in how precise your cut turns out.
Choosing the Right Cutting Implements
Not all scissors are equal here. You’ll want small, sharp scissors that can slide between the hair strands without snagging them. Regular household scissors are usually too bulky and can accidentally cut the hair instead of just the base.
Some people use a ‘multi-tool’ with a fine blade attachment for extra control, especially when working on tight curves or detailed shapes. If you go that route, keep a steady hand and work slowly.
The key is control. You’re not just cutting material; you’re working around individual hair knots. One wrong move and you risk shedding or damaging the piece.
So keep it simple: Sharp scissors, good lighting and patience. That combo works best!
Creating a Precise Template for Your Scalp
Before you cut anything, you need a template. This step is often skipped, but it's what separates a clean result from a messy one. A template helps you map out the exact area on your head where the piece will go.
You can make one using plastic wrap and tape, shaping it directly on your scalp. Once it fits right, trace the outline with a marker. This will then be your guide for creating a personalised hair system size.
Next place that template onto the base of the hair system and trace around it using a makeup pencil. Now you’ve got a clear cutting path.
This step also helps if you’re planning on cutting multiple pieces from one system. You can position each template carefully to avoid waste and make the most out of the base.
Step-by-Step Guide: How to Cut Hair System Base Safely
If you want to learn a reliable step-by-step process for cutting your hair system base, it comes down to preparation, control and patience. The number one tip is to not rush through this. Each step builds on the last and skipping ahead usually leads to mistakes.
Preparing the Mannequin Head and System
- Step 1) Now that you have created the template and marked the outline on the system, place your hair system on the .
- This keeps everything stable while you work and gives you a better angle than trying to cut it in your hands.
- Step 2) Secure the system so it stays attached and does not shift during cutting.
- You can use pins to hold it in place, especially around the edges.
- Step 3) Brush the hair away from the area you will be cutting. You can use some clips to keep it out of the way.
- This helps you to see the base clearly and avoids catching strands in your scissors.
- Step 4) Lighting matters. Work in a well-lit space so you can clearly see the base material, the knots and your guide markings.
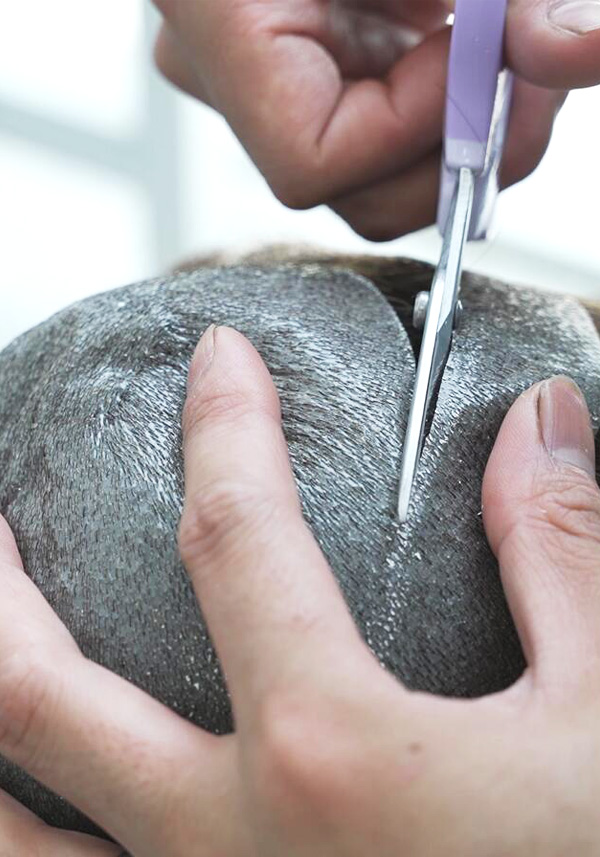
The “No-Hair-Cut” Technique
This is the most important part of base cutting. The goal is simple: cut the base without cutting the hair. Sounds obvious, but it does take some focus.
With your small, sharp scissors, start trimming along the marked outline. Go slow.
Instead of making long cuts, use small controlled snips. This gives you better accuracy and reduces the chance of cutting through the hair knots.
If you feel resistance, stop and check. This is a sign that you’re catching hairs instead of just the base.
This technique is the core of any successful DIY hair system modification. It will keep your system intact and wearable.
Achieving a Natural Front Hairline with Smaller Pieces
When you’re working with smaller sections, the front hairline becomes even more important. It's the most visible part so any flaws will stand out quickly. A clean cut and proper placement will help to keep things looking natural.
Maintaining the Integrity of the Material Edge
After cutting the base material, especially when using lace, the edges can become delicate. If this is then handled roughly, it may fray over time. To prevent that, avoid over-cutting or making jagged edges. Clean, smooth cuts always hold up better.
When attaching the piece, don’t pull too tightly on the base material. Gentle handling keeps it in tact for longer. A well-cut men’s hair system base should sit flat and stay secure without stress on the edges.

Blending Smaller Pieces with Existing Hair
Blending is where everything comes together. The length of the hair attached to the system will need to match the overall length of your natural hair. Start by trimming a piece slightly longer than needed then gradually blend it into your natural hair. This avoids harsh lines and makes the transition smoother.
Density matters too. If the hair on the system is too thick in comparison to your natural hair, it will stand out and not look very good. Thinning shears can help soften that difference. Take your time here too. Good blending makes even a simple cut look professional.
It is possible for you to skip this step at home entirely. Many people feel more comfortable cutting the system down to the size they need then going into a local salon for a professional stylist to cut and style the hair.
Custom Lordhair Systems vs. DIY Base Cutting
DIY base cutting gives you flexibility but it is not the only option. Lordhair offers custom hair system size solutions that take the guesswork out of the process. If you’re unsure about cutting your own system, going custom can save time and reduce risk.
Benefits of Ordering a Custom Topper
- Control over things that DIY cutting cannot change such as Hair Density, Wave Pattern and Front Contour Shape.
- Better consistency and more polished look
- Built to fit your exact measurements = no need for later adjustment
- A cleaner solution if wanting predictable results
Professional Base Cutting Service by Lordhair
If you already have a system but do not want to cut it yourself, Lordhair also offers a professional base cutting service.
A trained stylist can cut hair system base sections with precision, making sure the hairline and edges stay intact.
This is a solid middle ground - keeping your system while avoiding DIY risks.

Managing Different Types of Hair Loss Areas
Different areas of hair loss need different approaches. Cutting one shape does not fit every situation especially when dealing with alopecia or uneven thinning.
Cutting for the Crown Area
The Crown usually requires a circle or oval shape. When cutting for this area it is important to follow the natural swirl pattern of the hair growth. Due to this, the crown is tricky but manageable with patience.
Cutting for Receding Temples
Receding temples usually require thin strips or triangles. These smaller hair system pieces are perfect for filling in the front hairline. Position them carefully along the temples and blend them into your natural hair.
You can often get multiple strips from one system, especially if you plan your cuts ahead.
Learn how to make your own hair patch with stylist Aaron
Long Term Care for Modified Hair Systems
Once you've done the base cutting, maintenance becomes key. Smaller pieces need a little bit more attention to stay in good shape.
Cleaning and Washing Cut Base Pieces
When cleaning these pieces, be careful. If they’re handled roughly they can be damaged.
Use mild shampoo and avoid scrubbing the base directly, instead let the water run through it.
Pat dry - do not twist or wring. This will help the material keep its shape.
Adhesive Selection for Smaller Base Sizes
Choosing the right adhesive matters more with smaller bases. You want something strong enough to keep the piece attached but not so aggressive that it damages the material.
Tapes work well for quick applications while liquid adhesives offer a longer hold time. For DIY hair system modification, test different options to see what works best for your routine.
DIY Base Cutting: Final Thoughts
While it’s possible to cut a hair system at home, it's not an ideal choice for every person. Lacking the skill or experience, you can damage the base, which is hard to fix.
The safer options: use Lordhair's Cut to Size service if your loss area is smaller than a standard base, or go with a partial hairpiece designed specifically for targeted coverage. Both get you a better result with far less risk.
Contact us today via Online Chat or Email if you have any unanswered questions about cutting your hair system into smaller pieces. Our experts will be more than happy to assist you!
 TALK TO US
 EMAIL
EMAIL You can also find us on:
FAQs
How do I cut my hair system base?
Place the unit on a mannequin head, secure the hair away from the cutting area and follow your marked template using tiny, sharp scissors. Move slowly along the base material, cutting just outside the line. This keeps the structure intact and supports clean DIY hair system modification.
What is the base size of a stock hair system?
The standard base size for most stock hair replacement units is 8 inches by 10 inches. This size can be trimmed down during base cutting to create a custom fit for different areas such as the crown, front hairline or sides.
Does cutting a hair system into pieces ruin it?
A: It depends on how it's done and what base material you're working with. If you cut carelessly or use the wrong scissors, you risk fraying lace edges, cracking a skin base, or damaging ventilated knots near the cut line. If it’s done carefully with sharp scissors and a clear plan, cutting a system into smaller pieces is a viable option, especially for experienced wearers.
Is it better to just order a frontal hair piece directly instead of cutting a full system?
A: For most people, yes, especially if you're newer to hair systems. Lordhair offers frontal hairpieces and hair patches that are designed specifically for partial coverage. Cutting down a full system is a workaround that works, but a dedicated partial hairpiece is more precise, less risky, and often more cost-effective for your specific need.
Can a barber cut a hair system?
A barber or stylist can shape and blend the hair on hair systems, but cutting the base is a very different skill. If you want a professional to help cut your hairpiece, be sure to find someone very familiar with men’s hair systems.